Showing posts with label How to. Show all posts

Thursday, December 13, 2018

How to disable a device in Windows Device Manager?

If you’re facing some problems due to enabling device and if disabled it, Windows will no longer assign system resources to the device and no software on your PC can operate the device. Here are some tips to follow to remove a device in Windows Device Manager.
  1. Go to Windows Device Manager – Power User Menu is the simple method in the updated versions of Windows and Control Panel is suitable to find Device Manager in Older Versions.
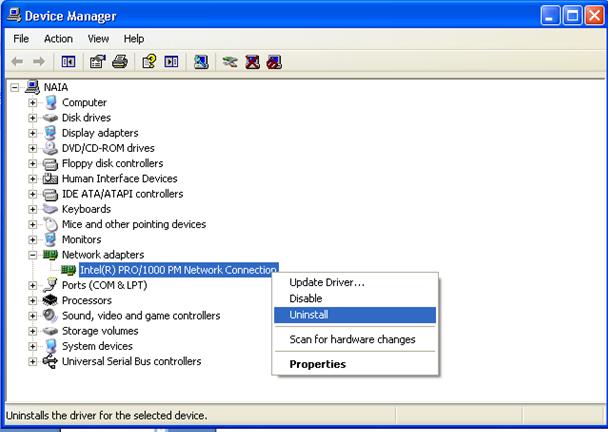
  2. Locate and highlight the device – After the Device Manager window is selected, see the device you want to disable by locating it within the category.
For instance, to disable your network adapter, you have to look within your “Network adapters” or in the “Bluetooth” category to disable a Bluetooth adapter. Additional devices might be slightly harder to find, but be comfortable to look in as many sections as you want.
devmgr-uninstall
–     If you use Windows 10/8/7, tap the > icon to the left of the computer to access the category sections. The + icon has to be used in older versions of Windows.
  1. Once you locate the device you wish to disable right-click or tap and hold and select Properties from the menu.
  2. Tap the Driver tab from the Properties window
For Windows XP Users – Stick to the General tab and select the Device usage: see a menu in the lower part and select “Do not use this device(disable) and you have to skip down to step 7.
–    In case you don’t find the Driver tab or that option in the general tab, ensure that you pressed the properties of the device itself and not the properties of the category it is in
Come back to step 2 and ensure that you use the expand buttons to go to the category, and then follow step 3 once you have chosen the device you’re disabling.
  1. Select the Disable Device button only if you use Windows 10, or the Disable button if you use an older version of Windows.
  2. Press on Yes when you see this message “Disabling this device will prompt it to stop functioning. Do you really want to disable it?”
  3. Press OK on the properties window to get back to Device Manager.
  1. Now when you’re done with the disabling, you will notice a black arrow or red x shown on the upper part of the icon for the device.
Emma Justine is a Microsoft Office expert and has been working in the technology industry since 2002. As a technical expert, Emma has written technical blogs, manuals, white papers, and reviews for many websites such as office.com/setup.

How to Delete a Bookmark in Mozilla Firefox


When you mostly worked on a browser for a very long period, you find that your list of bookmarks are unnecessarily added in the browser you use, and now it’s becoming too difficult to manage then it’s high time you should do your editing. You can either remove a single bookmark from the Firefox window or many additional pages from the Bookmarks List.


When you Delete a single Bookmark
  1. Visit the Mozilla Firefox browser.
  2. Choose the “Bookmarks” button from file bar – Now go to that page you want to delete.
  3. Press the star icon – This icon you find in the top right corner of the browser to the right of the search bar. A menu called “Edit your Bookmarks” shall be present on the display.
  4. Press on the box named “Remove Bookmark” – To figure out if the bookmark has deleted, you have to reopen the browser and see under the “Bookmarks” icon in the toolbar.
When you Delete Many Bookmarks
  1. Visit the Mozilla Firefox browser.
  2. Press on the Bookmarks buttons from the toolbar – Now a drop down menu will be shown where you can choose “Show All Bookmarks.”It will launch the library window.
  3. Press the folder you want to edit – Choose this folder from the left-hand side, and its contents will appear in the right-hand window.
  4. Choose the bookmarks you wish to remove – Press on the file you wish to remove and hold down the Command Key with you scroll over to the other bookmarks you want to delete.
  5. Choose the cog icon – You can find this icon in the top left-hand corner, and a drop-down menu will appear. Click “Delete.”
Hope this article helped you delete the unrequited bookmarks on your browser.
Emma Justine is a self-professed security expert; she has been making the people aware of the security threats. Her passion is to write about Cyber security, cryptography, malware, social engineering, internet and new media. She writes for Norton security products at norton.com/setup.

Source: http://my-nortonsetup.com/blog/how-to-delete-a-bookmark-in-mozilla-firefox/

Monday, December 10, 2018

How to Quickly Format a Drive and Disk in Windows 10?

Whenever you brought a new hard drive or want to install Windows on your system, it is important to format the drive before you use it to store your important data. Usually, formatting means deleting any of your existing data or information on your drive and also setting up the file system so that your Windows 10 operating system can easily be able to easily read and write data to the drive. There are high chances that your drive might be used with some another file system in which case you won’t be able to install Windows 10 because it won’t understand the file system and thus, can’t read or write data to the drive.
Now to solve this issue mentioned above, you need to format your drive with the proper file system, and then your drive will be ready to use with the Windows 10 operating system. While formatting the drive, you have to choose from these given file system like FAT, FAT32, exFAT, NTFS, or ReFS file system. It can also show you the option to do a quick format or full format.
format1-10829560
Here we discuss the complete steps to format a drive and disk in the Windows 10 quickly.
Steps to Quickly Format a Drive and Disk in Windows 10
Generally, the time required to format any drive mostly depends on the size of the disk but you can make sure about one thing is that quick format will always complete quickly in comparison to full format. We recommend you that before following the steps you must have to create a restore point and backup only if in case something goes wrong. Here how to do it:
Format Disk or Driver in File Explorer
  1. Click the Windows + E keys together on your keyboard to open the File Explorer.
  2. Then, click to open “This PC option.
  3. Right-click on the drive that you want to format.
  4. From the context menu choose “Format” option.
Note: when you format the C: Drive, after that you won’t be able to access the system because your operating system would automatically be deleted once you format this drive.
  1. After that, from the File System drop-down menu choose the supported file system like FAT, FAT32, exFAT, NTFS, or ReFS, choose according to your use.
  2. Ensure that you leave the allocation unit size option to “Default allocation size.”
  3. Under the “Volume Label” field, name this drive anything you want.
  4. Next, choose check or uncheck the “Quick Format” option, it usually depends on what you want like quick format or full format.
  5. Lastly, review your choices and then click on the Start tab.
  6. Click on the OK tab to confirm your action.
Emma Justine is a McAfee product expert and has been working in the technology industry since 2002. As a technical expert, Emma has written technical blogs, manuals, white papers, and reviews for many websites such as mcafee.com/activate.

How to Optimize and Defrag Windows 10 Drives?

For proper functioning of the computer system, it is necessary to improve the performance of your computer and to help with this Windows 10 performs disk defragmentation once a week for hard drives. But now, by the default settings, the disk fragmentation automatically runs on a weekly schedule at a specific time which is already set in the automatic maintenance of your computer system. Also, you can manually optimize or defragmentation of your drives on your computer system.
However, disk defragmentation now re-arranges all the pieces of data which spread across your hard drive and stored them again. Whenever the files are written to disk, it is broken into many pieces as there is not sufficient adjacent space to easily store the comprehensive file on time, thus file become fragmented.

Generally, defragmentation decreases the file fragmentation thus improving the speed by which the data is written and read to disk which ultimately increases the performance of your computer system. While the disk fragmentation also helps in cleaning the disk, therefore, increasing the overall storage capacity.
Here we will discuss the complete steps of how to optimize and defrag Windows 10 drives.
Steps to Optimize and Defrag Windows 10 Drive
Before continuing the process, we suggest you create a restore point on your system it will protect your data if something goes wrong. And follow the steps in a given sequence to make steps easier. Here how to do it:
  1. Click the Windows + E keys together to open File Explorer.
  2. Then, double-click on the ThisPC option.
  3. Right-click on any hard drive partition that you want to run defragmentation for.
  4. After that, choose Properties option.
  5. Change it to Tool tab and then click on the “Optimize” in the Optimize and defragment the drive.
  6. Choose the drive for which you want to run defragmentation for.
  7. Next, click on the Analyze button and check it needs to be optimized.
Note: check if your drive is fragmented more than 10%, then it should be optimized.
  1. To optimize the drive, click on the Optimize button.
  2. Wait for a few minutes; the defragmentation process will take some time which depends upon the size of your disk.
  3. Close all the tabs.
  4. And finally, restart your system.
Emma Justine is a Microsoft Office expert and has been working in the technology industry since 2002. As a technical expert, Emma has written technical blogs, manuals, white papers, and reviews for many websites such as office.com/setup.

Monday, December 3, 2018

How to Troubleshoot Windows Update Error 80244019?

All Windows update is a storehouse for everything which is latest for Windows from the Microsoft. Usually, all users received updates frequently due to this Windows Update service. However, this Windows update mechanism will fully depend on various services like BITS or some Background Intelligent Transfer Service, Windows Service Update Services, Windows Update Services, and many more. And because of this yet efficient delivery system, your computer system shows an error message on your screen. The Error is 80244019, and this Windows Update error only applies to the Windows Server operating systems.
windows-update-error-code-80244019-on-windows_en
In this guide, we will explain to you that how you can fix this Windows Update error 80244019. By below-given solution, you can be able to solve this error. Some possible solutions are discussed below.
Generally, this error occurred due to the following reasons:
  • Some files are not found on the server.
  • Some Malware issues might occur on your system.
  • The issues related to the Connectivity might occur.
  • Faulty corrupted DLL files or Registry entries might happen on your system.
By this Windows Update error, users may face many issues such as some laggy experience, startup and shutdown issues, shows some software installation errors, issues connecting some external devices.
Steps to Troubleshoot Windows Update Error 80244019
For fixing this Windows Update error 80244019, we need to undertake the following fixes they are as follows:
  1. Restart various WU related services.
  2. Reconfigure Windows Update settings.
Before starting the process, we suggest you use these methods in the given sequence so that it will avoid some more errors and also take less time.
Method-1: Restart Various WU Related Services
  1. Press WINKEY + X keys together on your keyboard.
  2. Then, select Command Prompt (Admin) to open Command Prompt with Administrator Privileges.
  3. Next, copy and paste the given commands one by one in the Command Prompt:
  • net stop wuauserv
  • net stop bits
  1. Then, press the Enter button.
  2. Now, this will automatically stop all the Windows Update running on your Windows 10 computer.
  3. Subsequently, start all the Windows Update Service which we stopped in the above steps by typing the same command:
  • net start wuauserv
  • net start bits
  1. Lastly, check it that the error is solved or not.
Method-2: Reconfigure Windows Update Settings
Users can also change the following settings direct from the Windows Update Section, and then try to fix this error.
  1. Press WINKEY + I keys together on the keyboard to open the Settings App.
  2. Now, click on the Update & Security section.
  3. Under the Windows Updates section, click on the Update Settings.
  4. Then, click on the Advanced Options.
  5. Lastly, unmark the option that says “give me updates for other Microsoft Products when I update Windows.
  6. Finally, restart the computer system for all the changes to take effect.
  7. Then, checked it once, if this method fixed your issue.


Emma Justine is a Microsoft Office expert and has been working in the technology industry since 2002. As a technical expert, Emma has written technical blogs, manuals, white papers, and reviews for many websites such as office.com/setup.

How to Turn On or Off Full Screen Optimizations on Windows 10?


The Full-Screen Optimization is a Windows 10 feature which helps the operating system to function better. By default, it is enabled for applications such as video games and players. Whenever this Full-Screen Optimization feature is enabled, then the video playback and gaming experience are automatically increased by prioritising the GPU and CPU resources for that particular process.
However, sometimes when it is in the screen-mode, then it results in a drop in the frame rate (FPS). That time, there is one solution to fix these frame drops issue would be to disable these full-screen optimisations, but unluckily, Microsoft in its recent release has removed this feature for Windows 10. But here are some ways by which you can still be able to get this done. Here is how to do it.
1-disable-fullscreen-optimization-for-games-on-Windows-10
Steps to Enable or Disable Full-Screen Optimizations
In this article, we provide you with two simple ways by which you can surely be able to solve this issue. The two simple methods are as follows:
  • Use the Windows 10 Settings.
  • Use the Registry Editor.
But before starting the process, we suggest you that use the given steps in a given sequence, by doing this will take your less time and also helps you by preventing you from different errors.
Method-1: Use the Windows 10 Settings
For previous releases, you need to follow this method. Though, this method is not available for the releases starting Windows 10 v 1803. The steps are discussed below:
  1. Firstly, open the Windows 10 Settings app.
  2. Now, go to the System section.
  3. Then, under the System section, go to the Display
  4. Next, under the Display tab, navigate to the Advanced graphics settings or Graphics Settings option.
  5. Under the Advanced or graphics settings section, labelled as Full-screen optimisations.
  6. Now, unmark the option labelled as Enable Full-screen optimisations to disable the feature easily.
Method-2: Use the Registry Editor
  1. Press the WINKEY + R keys together on the keyboard to open the Run utility tab.
  2. Type the command “regedit” in the command box.
  3. Click on the Enter key.
  4. Then, click on the Yes option for the User Account Prompt which you get on the screen.
  5. Once the Registry Editor Option opens, then go to the following key location:
  • HKEY_CURRENT_USER\System\GameConfigStore
  1. Next, right-click on the Explorer tab.
  2. Choose “New” option.
  3. Under” New” section, select and click on the DWORD (32-bit) Value.
  4. Now, give a name to the newly created DWORD TO GameDVR_DSEBehaviour.
  5. Click on Enter to save it.
  6. Finally, double-click on the Game DVR_DSE Behaviour DWORD and then set its value to the following, it fully depends on your choice or requirements:
  • Disable Full-screen optimisations.
  • Enable Full-screen optimisations.
After you completed the steps, close the Registry Editor and restart your computer system for the changes to take effects successfully.
Emma Justine is a Microsoft Office expert and has been working in the technology industry since 2002. As a technical expert, Emma has written technical blogs, manuals, white papers, and reviews for many websites such as office.com/setup.

How to disable a device in Windows Device Manager?

If you’re facing some problems due to enabling device and if disabled it, Windows will no longer assign system resources to the device and...